Building My Proxmox Homelab
Ever since I’ve graduated, I needed a way to apply all my theory into practice in safe environments under legal conditions and without harming others. So I’ve went ahead and installed Proxmox on an old computer of mine to virtualize multiple devices and experiment with some of the tools that I’ll eventually be using in my professional career within the comforts of my home office.
Hardware Overview
This dated office computer we had lying around was used for this project. It’s not great, but it gets the job done:
- CPU: 4 x Intel(R) Core(TM) i5-3340 CPU @ 3.10GHz (1 Socket)
- RAM: 16GB
- Storage: 1 x 1TB HDD, 100 GB will be allocated to the Proxmox OS, the rest will be used for the virtual machines and containers.
- Networking: Single 1Gbps NIC on a 100Mbps switch
The switch helps the Virtual environment have both access to the LAN network and the WLAN network, which will be useful in managing Firewalls and SIEMs that will interact with my home local network. My future plan is to upgrade the switch for wider bandwidth.
Despite the dated hardware, most of the equipment I had served it’s purpose, despite having to overly manage my memory usage on multiple VMs, make sure that every virtual machine was using sufficient amounts of resources without limiting functionalities.
Installing Proxmox
I installed Proxmox with ease. I downloaded the ISO image, burned it onto a USB, and followed the installer. I made sure to:
- Set up my storage pools correctly right from the start.
- Install networking with a bridge so that VMs can talk to one another and the internet. We call this a Virtual Switch which only the virtual machines inside of the environment can interact with, and external access is not possible.
The installation was extremely simple, however I was unable to capture screenshots, however the other components of this project will have their own segments where we walk through their installations step-by-step.
Virtual Machines and Containers
Once Proxmox had been installed and operational, I installed a few VMs to fulfill my main use cases:
- Kali Linux for penetration testing experimentation.
- Ubuntu Server for general Linux practice and small server projects.
- pfSense to simulate a firewall/router setup and test network settings.
- Wazuh Server to monitor my endpoints and aggregate security alerts, giving me some hands-on experience with SIEM-like capabilities.
As mentioned prior we will walkthrough installation steps in their own pages, and I will be expanding upon this page once I install more specialized virtual machines.
Use Cases
As stated prior, I wanted to practice theory and learn how different systems interact with one another, understand how to install and configure my own network topology and so on:
- Rehearsing SOC operations and monitoring configurations with Wazuh, viewing logs, and reacting to alarms.
- Pen testing on Kali Linux without compromising the security of my primary network.
- Automated scripts for testing, deployment strategies, and server configurations.
- Simulating complex network topologies using pfSense to understand routing, firewalls, and VLANs.
- Testing disaster recovery strategies, snapshots, and backup scenarios to recover VMs in a quick manner.
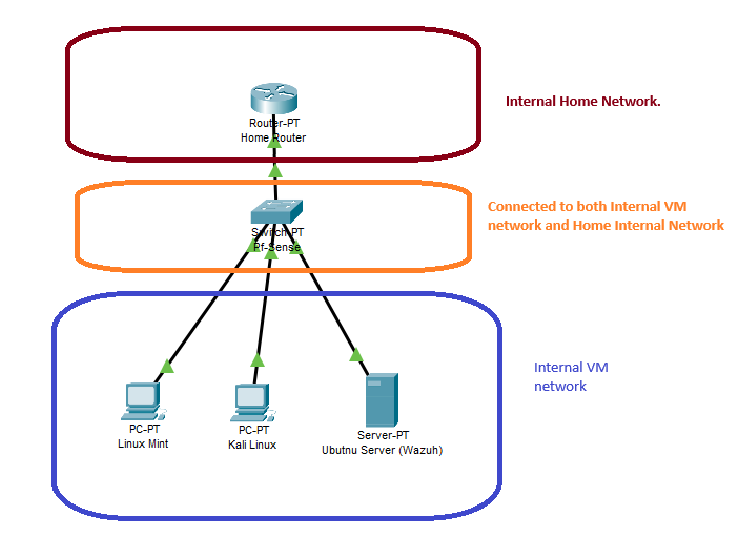
Network Topology
Here’s a visual overview of my homelab network setup. The main goal was to keep the lab isolated from the main home network while allowing all virtual machines to communicate with each other. The single NIC on my server is bridged in Proxmox, connecting the VMs to the switch (Which is pfSense in this case), which lets me experiment with VLANs, routing rules, and firewall configurations via pfSense without affecting other devices at home.
Initial setups
Go ahead and download the Proxmox VE from their website at: https://www.proxmox.com/en/
Once you’ve got it downloaded, you can use Etcher or Rufus, I primarily use Rufus to create a bootable drive. Once you have your flash drive, plug it in and begin installation.
Warning! Your data will be lost upon installation of Proxmox, make sure that all valuable data has been extracted from the drives before you begin installation!
This is the most important part of your installation, you will be locked out of your Proxmox virtual environment, having to reinstall it again.
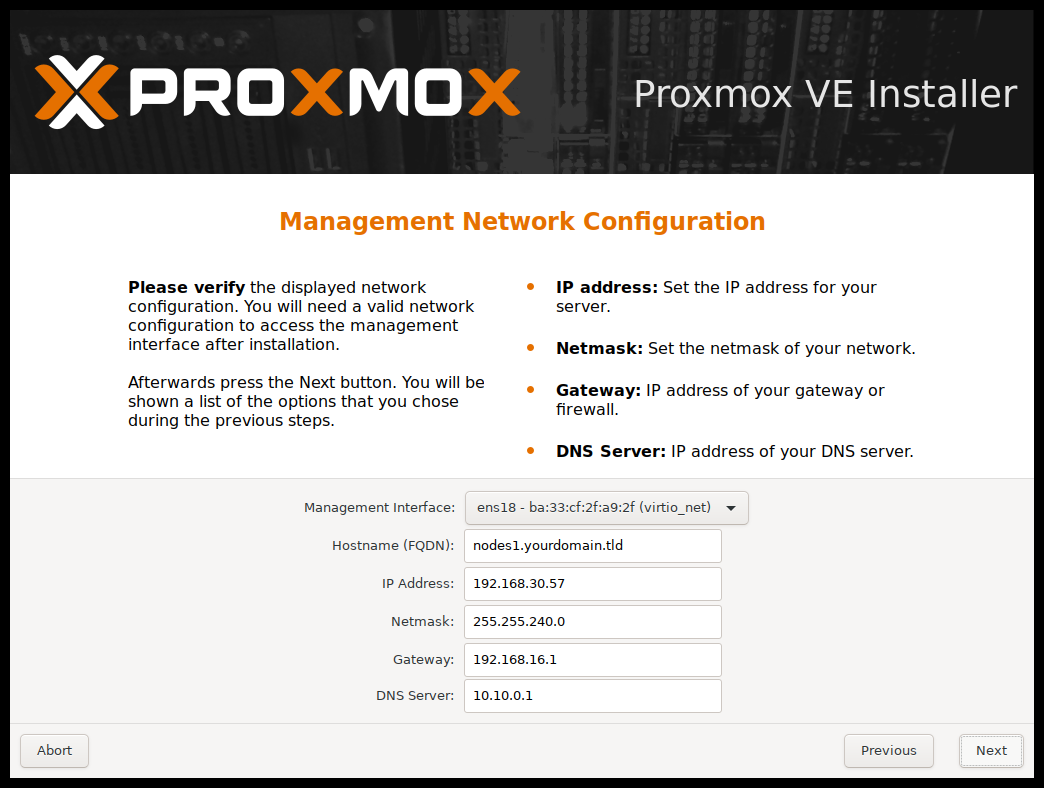
Let’s go through the steps one by one,
- Your management interface is where network traffic will flow from, typically your ethernet port.
- Hostname you needn’t concern yourself with, but in the case you plan on using it in a domain, I suggest (NAME).home.arpa
- IP addressing: This IP address will stay the same for the lifespan of your server, Make sure that it is within your range (For example, check your default gateway, if it’s 192.168.1.1, then you can make your server 192.168.1.100).
- Ignore the previous image’s netmask value, set it as 255.255.255.0, this is the standard in many cases and you won’t have a reason to change it to something else.
- Gateway: As previously mentioned, this is the same IP address that your ‘router’ has, so in my case, my router’s default gateway is 192.168.255.1
- And lastly, DNS servers don’t matter quite much, you can use a popular one like CloudFlare or Google at 1.1.1.1 and 8.8.8.8 respectively
With that, click install and have yourself a cup of coffee. Once it’s completed, validate all your information and then reboot the server. This is the part where you’ll be able to connect to the web interface using the IP address you gave to your server.
https://192.168.xxx.xxx:8006 to connect to said server, if everything was done correctly, you’ll have a prompt for a login which you’ve decided on during the installation.
A suggestion I have for new users of Proxmox is to use a post install script, you can follow this guide here: https://tteck.github.io/Proxmox/#proxmox-ve-post-install
And that’s that! You can download ISOs into your local drive, and the LVM drive will be the one to host the VMs, feel free to explore and discover. I also recommend the forums for any technical difficulties.